Photographing Methods
Below are 4 methods that I have used over the years. Number 4 is the best. The others are more portable and can be used if you are going to photograph specimens some place other than at home.
Method 1
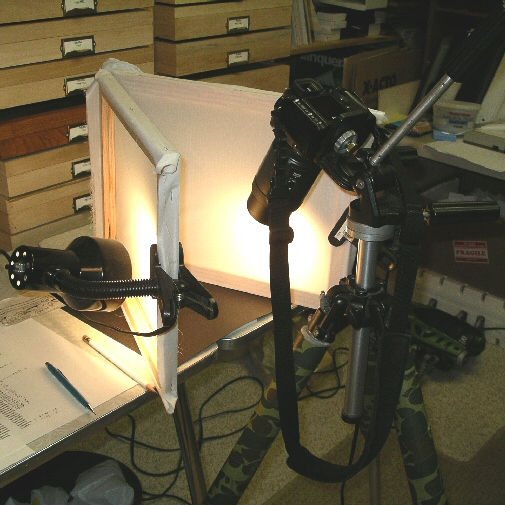
This is the setup I use to photograph specimens. I have a piece of
black construction paper that I have punched a small hole in. Under the
paper, I have a piece of foam that I insert the pins in. The black
paper does away with shadows.
There are two frames that I have
placed a silky white cloth over and then I attach two clamp on lamps. I
use regular incandescent light bulbs. I then use the setting on my
digital camera for incandescent bulbs for the proper color balance.
I record the specimen number,
size of the specimen and the file name of the picture.
I use my 100 mm macro lens and
also my 35 to 70 mm lens with an extension tube for photographing. I
turn the specimens sideways so the the long side of the specimen is
vertical. This insures that I can crop the pictures in a square manner.
After transferring the pictures to my computer, I crop them and resize
to 3 inches and 100 dpi.
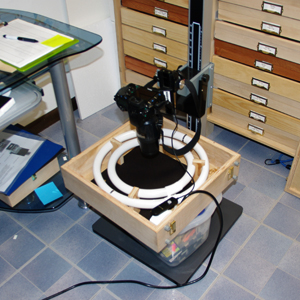
Method 2
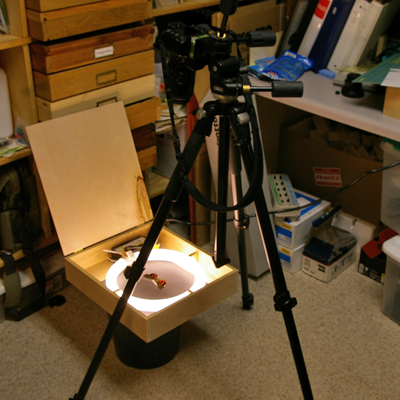
This is a new setup that I am starting to use. This
is more portable and allows me to set the camera looking down squarely
on the subject. The above setup required me to shoot at a large angle. For
larger specimens this was somewhat of a problem. The new setup allows
for the specimen to be more square to the camera.
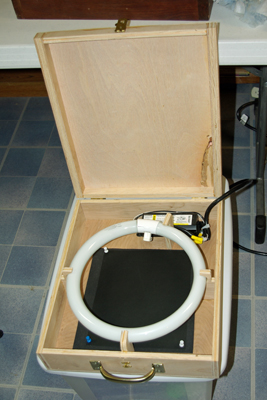
The box is made out of 3/4 plywood (14 x 16 inches). I put a rabbit on
all four sides. I then made the sides out of 1/2 inch plywood, 2 7/8
inches high. Inside is mounted a 12 inch fluorescent ring bulb that is
set up from the bottom.. I mounted a ballast transformer and hooked up a
six foot cord. In the bottom, I hollowed out a 3 inch square and placed
a piece of foam for the pins to stick into. Over that is a piece of
black construction paper (Try to get a good fine piece. I use Strathmore
400 Artagain C Black 446-8 19x25 for most moths. For black moths I use
Stratmore 451-6 Blazer Blue) . The ring gives
good even lighting.
I use the normal AWB setting on my camera. I use my 100 mm macro lens and also my 18 to 55 mm lens for photographing. I turn the specimens sideways so that the long side of the specimen is vertical. This insures that I can crop the pictures in a square manner. I use Adobe Photoshop Elements (x). After transferring the pictures to my computer, I use the auto color correction to correct for the flourescent light. This method makes the background black and gives the moth the correct color. I crop them and resize to 3 inches and 100 dpi.
Method 3
One problem I encountered with method 2 was that I got a halo of light on larger specimens (4 inches or bigger). I found a dual bulb 16 and 12 inch light. With this light I can remove the inside ring when I am photographing the large specimens. The box size is 17 1/8 by 17 1/8 by 5 inches. For this box I used 3/4 plywood (what I had) and used the mounting clips that came with the light to mount the outside ring bulb. For the inside ring bulb, I made 4 inch blocks that have half rings cut out for the two bulbs. I use rubber bands to hold the blocks to the two bulbs.


Method 4
I finally purchased a copy stand. One of the problems with the use of a tripod, was that it was not as stable as I wanted. I also had to play with getting the camera square over the specimens. The copy stand works great for aligning the specimens up and also for moving the camera up and down as needed to adjust for size differences with the specimens. In using the 100mm macro lens and the copy stand, I can photograph everything from about 6mm up to 70mm without changing lens. For the big silk and sphinx moths, I have to use a 18-125mm lens.